
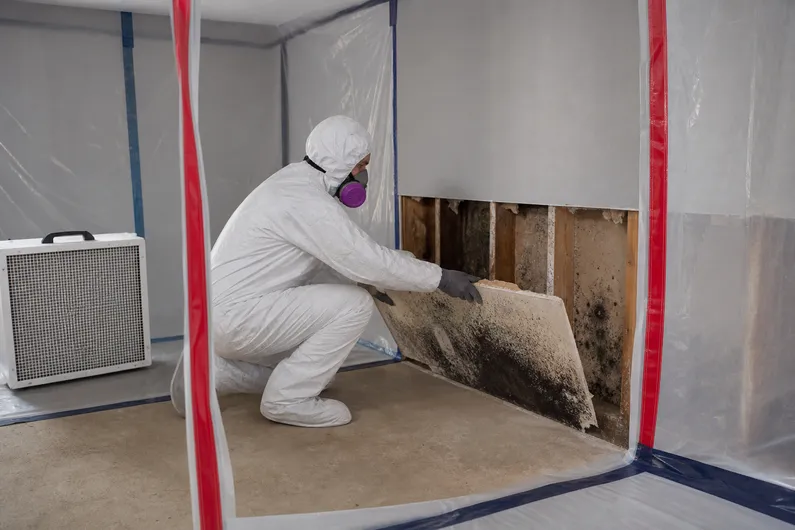
Mold remediation is not just a cleanup step after water damage. It is the process of controlling the moisture problem, preventing spores and dust from spreading into clean areas, removing materials that cannot be safely restored, cleaning what remains, and confirming the area is ready for repairs.
That distinction matters because homeowners often hear the words “mold removal” and “mold remediation” used as if they mean the same thing. They do not. Mold spores exist naturally in indoor and outdoor air, so the goal is not to promise that every spore in a building disappears. The practical goal is to correct the moisture source, remove the affected contamination and damaged materials when needed, and return the area to a dry, stable condition.
For property owners in Massachusetts and Rhode Island, mold remediation often follows roof leaks, burst pipes, appliance failures, basement moisture problems, or water damage that stayed wet too long before cleanup began. This guide explains what the professional process usually looks like, when testing is useful, and what homeowners should expect before rebuilding starts.
What mold remediation actually means
Professional mold remediation is a structured response to a moisture-driven contamination problem. It usually includes:
- Finding and correcting the water or humidity source
- Inspecting the visible and likely hidden extent of damage
- Establishing containment when the scope or location requires it
- Using controlled debris handling and air filtration during removal work
- Removing mold-damaged porous materials that cannot be restored
- Cleaning remaining structural surfaces with material-appropriate methods
- Drying the area and confirming unresolved moisture is not still present
- Documenting the work for the property owner and, when applicable, the insurer
The EPA says the key to mold control is moisture control. That principle is what separates real remediation from cosmetic cleanup. If someone wipes a stained wall but leaves the wet framing, active leak, or high-humidity condition in place, the problem is still there.
Why mold often shows up after ordinary water damage
Mold does not require a dramatic flood event. It often starts after the quieter losses that property owners underestimate:
- A bathroom supply line that leaked behind the vanity
- A roof leak that kept wetting insulation and drywall
- A burst pipe inside a finished wall
- A slow appliance leak under kitchen cabinets
- Basement materials that stayed damp after heavy rain
The EPA’s mold guide advises drying water-damaged areas and items within 24 to 48 hours when possible to help prevent mold growth. When that does not happen, moisture can stay trapped behind baseboards, under flooring, inside drywall cavities, in insulation, or in framing that still looks normal from the room side.
That is why mold remediation is often connected to water damage restoration, not separate from it. The water problem may start the event, but the mold problem expands the scope once wet materials remain damp long enough.
Step 1: Stop the moisture source first
No remediation plan is complete until the moisture source is corrected or controlled.
That source might be:
- A repaired plumbing leak
- A roof repair or temporary weather protection
- Basement seepage that needs drainage correction
- Condensation driven by poor ventilation or humidity
- Wet materials left behind after a prior water loss
The CDC says that if you see or smell mold, you should clean it up and fix the moisture problem. In practice, that means remediation should not begin as if it were only a surface issue. If the building is still getting wet, the project is not ready for a real finish line.
This is one reason property owners should be cautious about shortcuts. Painting over staining, spraying a visible patch, or replacing one piece of drywall without addressing the surrounding moisture may make the room look better briefly while the actual condition keeps spreading behind the surface.
If the moisture event began with a recent leak and the building still needs drying, review what happens from extraction to drying during water damage restoration to understand how the structural dry-out stage fits before or alongside mold work.
Step 2: Inspect the visible and hidden extent of the damage
The next step is scoping the affected area properly.
Visible mold is only part of the job. Technicians also look for:
- Musty odor patterns
- Water history and likely travel path
- Wet drywall or trim below the visible growth
- Hidden damage behind cabinets or vanities
- Ceiling or wall cavities below roof or plumbing leaks
- Flooring, subfloor, or lower-wall moisture in basements
This inspection stage matters because remediation plans fail when the crew treats only the spot that is easiest to see. A wall corner with visible mold may be the symptom, not the full boundary of the problem.
That is especially true after upper-level leaks or roof failures. If the source involved the roof system, read signs mold has spread behind walls after a roof leak for the hidden conditions that often expand the scope beyond the first stain or musty smell.
Step 3: Set up containment and air-control measures
Containment is one of the clearest signs that a remediation project is being treated as a contamination-control job rather than ordinary demolition.
Depending on the size and location of the loss, professionals may use:
- Plastic barriers to isolate the work zone
- Controlled entry points
- HEPA-filtered air scrubbers or negative-air setups
- Protective clothing and respirators
- Debris bagging and removal paths that avoid clean rooms
This is not theater. The purpose is to reduce the chance that disturbed dust and spores spread into unaffected parts of the property while materials are being opened and removed. In larger or more disruptive projects, physical barriers and HEPA-filtered air control help keep the work zone separate from the rest of the home or business.
Step 4: Remove mold-damaged porous materials when needed
One of the biggest homeowner questions is whether everything has to be torn out.
The answer is no, but some materials often do need removal when they are mold-damaged or stayed wet too long. The EPA notes that absorbent or porous materials such as ceiling tiles and carpet may have to be thrown away if they become moldy because mold can be difficult or impossible to remove completely from those materials.
In a residential remediation project, materials commonly evaluated for removal include:
- Drywall
- Insulation
- Carpet and pad
- Pressboard or swollen cabinetry components
- Trim or built-ins that cannot be cleaned effectively
- Soft contents that are too damaged or contaminated to restore
The decision is based on the source of moisture, how long the material stayed wet, whether growth is visible or embedded, and whether the material can be cleaned and dried to an acceptable condition.
This is why “spray and save everything” is not a reliable standard. Some hard structural materials can often be cleaned. Some porous finish materials cannot. A responsible contractor explains that difference clearly and documents what was removed and why.
Step 5: Clean remaining structural surfaces
After damaged porous materials are removed, the remaining structure still has to be addressed.
That may include:
- HEPA vacuuming settled debris and loose contamination
- Wiping or scrubbing hard structural surfaces with appropriate cleaning methods
- Cleaning framing or sheathing that remains part of the structure
- Re-checking nearby areas for unresolved debris, residue, or hidden moisture
The goal is not to make the exposed cavity look new for a photo. The goal is to remove remaining contamination, reduce the chance of spread, and prepare the area for drying and repair.
This is another place where terminology matters. “Mold removal” sounds like one dramatic action. Remediation is usually a sequence of controlled steps, and cleaning is only one of them.
Step 6: Dry the area and verify that moisture is no longer driving the problem
After removal and cleaning, the structure still has to be dry.
That can involve moisture checks on:
- Framing
- Subfloors
- Adjacent drywall left in place
- Lower wall assemblies
- Nearby rooms connected to the same leak path
If the affected area is not dry, rebuilding too soon can trap moisture back inside the assembly. That is how a project turns into repeat damage, recurring odor, or another mold call months later.
This dry-out stage is one reason mold jobs often overlap with prior or ongoing water-loss work. If the original event was a burst pipe or leak that has not been fully stabilized, those earlier emergency actions still matter. For freeze-related losses, the first-hour guidance in what to do when a pipe bursts in a Massachusetts home can help explain how to reduce the chance that the water event grows into a mold project.
Step 7: Rebuild only after the area is ready
Remediation is not the same thing as reconstruction.
Once the contamination is addressed and the area is dry, the property may still need:
- New insulation
- Drywall replacement
- Trim replacement
- Cabinet repairs
- Flooring repairs
- Paint and finish work
Homeowners often feel pressure to jump straight to the rebuild because the opened wall or containment zone is disruptive. The problem is that fast cosmetic closure can erase access before the structure is actually ready.
The right sequence is still the boring one:
- Stop the moisture source.
- Scope the affected area.
- Contain and remove what cannot be restored.
- Clean what remains.
- Dry and verify conditions.
- Rebuild.
When those steps stay in order, the property owner has a much better chance of getting one complete repair instead of a repeated cleanup.
When mold testing is useful and when it is not
Testing is one of the most misunderstood parts of mold work.
Testing is not automatically required for every visible mold condition. If there is clear visible growth on water-damaged materials, the remediation decision may already be obvious. Testing can still be useful when:
- The source is uncertain
- Occupants need documented third-party findings
- The suspected damage is hidden
- A transaction, property manager, or insurer requires it
- Post-remediation clearance criteria need to be documented
Testing is less useful when people expect it to replace corrective work. A lab result does not fix a wet wall. It helps define or confirm conditions.
First Response Restoration offers mold testing when appropriate, but the better question is whether testing will actually change the scope, documentation, or clearance decisions for that property.
Common homeowner mistakes that make mold jobs worse
Most avoidable mistakes happen before the professional crew arrives.
Common examples include:
- Painting over staining without opening the wet assembly
- Running uncontrolled fans across visible mold
- Tearing out drywall without containment
- Treating persistent musty odor as a cosmetic issue
- Rebuilding before surrounding materials are dry
- Assuming bleach or spray products solve hidden cavity growth
If you are still in the first response stage and need a broader sequence for safe decisions, use the Emergency Property Damage Checklist.
A local view for Bridgewater-area homes and businesses
In Bridgewater and nearby Massachusetts communities, mold calls often follow the same local patterns: basement moisture, older plumbing, roof leaks, storm-related water intrusion, and hidden dampness in finished lower levels. Humid summer conditions can also make a minor unresolved leak get worse faster once wet materials stay enclosed.
That is why the best local mold jobs are usually caught by connecting the mold problem back to the moisture problem early. First Response Restoration provides mold remediation in Bridgewater and across Massachusetts and Rhode Island for homeowners and business owners who need inspection, containment, removal, drying, and documentation support.
Frequently asked questions about mold remediation
What is the difference between mold removal and mold remediation?
Mold removal sounds like eliminating every spore, which is not a realistic building condition. Mold remediation is the practical process of correcting the moisture problem, containing the work area, removing contaminated materials when needed, cleaning remaining surfaces, drying the structure, and preparing the area for safe repair.
When should I call a professional for mold remediation?
Call when you see visible growth, smell persistent musty odor, know building materials stayed wet after a leak or flood, suspect hidden wall or ceiling damage, or need documentation for a larger property-loss claim. A professional scope is especially important when multiple rooms, porous materials, or occupied spaces are involved.
Does every mold problem require drywall removal?
No. Some conditions can be cleaned without removing every nearby finish. But mold-damaged porous materials often require removal when growth is embedded, moisture has stayed too long, or the affected area cannot be cleaned and dried to an acceptable condition. The decision depends on the material, moisture source, and scope.
Is mold testing always required before remediation starts?
No. Testing is not required for every visible mold condition. It becomes more useful when the source is uncertain, growth may be hidden, a third party needs documented findings, or a clearance target needs to be established. Visible mold with a known moisture source may already justify remediation without testing first.
Will homeowners insurance cover mold remediation?
Coverage depends on the policy, the moisture source, how long the condition existed, and any exclusions, limitations, or endorsements. A sudden covered water loss may be handled differently from long-term leakage or deferred maintenance. The restoration company documents conditions and work performed, while the insurer decides coverage.
How long does mold remediation usually take?
It depends on the size of the affected area, how much material must be removed, whether the moisture source is already corrected, and how long drying takes before repairs can begin. A small, isolated area is different from a leak that affected multiple rooms, lower walls, insulation, and contents.
Know what a real mold remediation process looks like
Mold remediation should feel organized, not mysterious. The essential pattern is straightforward: fix the moisture source, define the full scope, contain the work, remove what cannot be restored, clean and dry what remains, and rebuild only after the area is ready.
If your home or business has visible mold, musty odor, or hidden damage after a leak or flood, call First Response Restoration at (774) 670-5912 for 24/7 emergency dispatch across Massachusetts and Rhode Island.
Frequently asked questions
The process usually includes identifying the moisture source, assessing affected areas, establishing containment when needed, removing contaminated or unsalvageable materials, cleaning remaining surfaces, drying the structure, and documenting the work. The exact scope depends on the materials, extent of growth, water history, building conditions, and whether hidden areas are involved.
Testing is not required for every visible mold condition. It may help when the source or extent is uncertain, growth may be hidden, an occupant needs documented findings, or an insurer, landlord, or transaction requires specific information. The remediation scope should still address the moisture source and affected materials.
Preventing recurrence starts with correcting the leak, drainage, humidity, plumbing, roof, or HVAC condition that kept materials wet. Affected areas should be cleaned or removed as appropriate, structural materials should be dried and monitored, and repairs should not close a wall or floor assembly while unresolved moisture remains.


